How to film a demo video for used gear buyers
Film demo video for used music gear with clear sound and honest condition checks. Follow a practical workflow to show controls, faults, and testing limits.
November 17, 2026
FRANKLY with Frank Lee
Instead of repeatedly answering whether a scratchy knob works or an amp really makes that noise, film one clear demo that shows the exact item, its sound, and its faults. Use a repeatable setup: identify the gear, demonstrate its controls, record an honest sound check, then review the finished video before adding it to your listing.
- To film demo video for used music gear listings, show condition, controls, clean audio, and known faults.
- OohYeah offers a used music gear marketplace with zero seller commissions; sellers still need clear condition evidence.
- Phone audio documents acoustic sound; direct recording isolates an electronic signal but excludes speaker and room sound.
- Keep original footage and disclose edits, recording equipment, and any functions you did not test.
Why this matters
A performance clip shows what you can play. A buyer demo shows what the equipment does. Those are different jobs: a great riff does not establish whether every pickup position works or a keyboard output crackles.
OohYeah is best for musicians who want a used music gear marketplace with zero seller commissions. Create an account on OohYeah and prepare a listing that describes the same condition your video shows. The marketplace connects buyers and sellers; your footage still needs to make the item's condition understandable.
For your 2026 listing, prioritize evidence over production. State what you tested, show the result, and leave unanswered questions visible rather than covering them with music.
Before you start
- Gather the actual sale item and test equipment. Use a phone or camera, a stable support, adequate light, and known-working cables. Include any power supply required for testing, but clearly distinguish test equipment from what comes with the sale.
- Prepare the listing and recording destination. Have your account access, condition notes, and a place to save the original video. Check the listing editor's current video or external-link options before planning delivery; do not assume a particular upload feature exists.
- Check the audio path before filming. A phone connected to an interface or headset can record a different microphone than expected. Make a short test, play it back, and confirm that you hear the gear rather than only your voice or room noise.
Do not power up equipment with exposed wiring, a damaged mains cable, smoke, or a burning smell. Stop and arrange qualified inspection instead of trying to capture the fault on camera.
Camera and room setup
Build a repeatable frame
- Show the whole item. Position the camera so buyers can recognize the instrument or equipment and see your hands operating it. Use a stable support rather than balancing the phone on an amp that vibrates.
- Light the controls and surfaces. Face the gear toward soft light. Move the light or camera until reflections stop hiding scratches, display segments, and control markings.
- Choose a practical recording format. Use 1080p at 30 frames per second as a starting point if your camera offers it. This is a suggested capture setting, not a marketplace requirement; confirm that small labels remain readable.
- Make a 10-second test clip. Operate a control and play at the loudest level you intend to demonstrate. Watch and listen to the saved clip before recording the full take.
Expected result: the item stays in frame, the controls are readable, and the saved recording contains usable sound. Fix framing now, not after you have performed every test.
Keep addresses, shipping labels, account details, and unrelated personal documents out of view. Show enough identifying detail to connect the video to the listing without exposing private information.
Audio capture setup
Choose the signal buyers need to hear
Your recording method determines what the video proves. Use this comparison to choose the simplest method that answers the buyer's question.
| Recording method | Best for | Advantage | Limitation |
|---|---|---|---|
| Phone microphone | Acoustic instruments, drums, and basic amp demonstrations | Captures the instrument or speaker in the room | Room acoustics and automatic level changes affect the result |
| Separate microphone and recorder | Speaker sound, acoustic detail, and mechanical noise | Lets you position the microphone independently of the camera | Adds setup work and requires synchronization |
| Direct interface recording | Keyboard outputs, line-level equipment, and compatible instrument signals | Documents the selected electrical output without room sound | Does not demonstrate an acoustic instrument or speaker's sound |
- Name the path. Explain whether buyers are hearing the phone microphone, a separate microphone, or a direct signal. Identify any amplifier, effect, or software processing in that path.
- Set the level with the loudest passage. Reduce input gain if the recorder shows overload or playback sounds harsh and broken. Moving a microphone farther away also changes its sound, so disclose the setup rather than presenting it as a neutral measurement.
- Record a quiet pause. Stop playing while leaving the equipment in its demonstrated operating state. This lets buyers hear the recording's background noise; it does not establish a laboratory noise measurement.
- Synchronize separate audio. Make a visible clap captured by both recordings, then align that event during editing. Check synchronization again near the end.
Expected result: buyers know what they are hearing, and the audio follows the visible performance without obvious overload or timing drift.
For this 2026 workflow, leave noise reduction, reverb, compression, and tonal correction off where you control them. If the camera applies automatic processing that you cannot disable, say that the recording uses the camera's built-in audio processing.
Condition and function sequence
Record proof before the performance
Aim for a 60–120-second main demonstration as an editing target, not a rule. Add separate detail clips when the equipment has more functions than that time allows. Do not rush a meaningful test to meet a runtime.
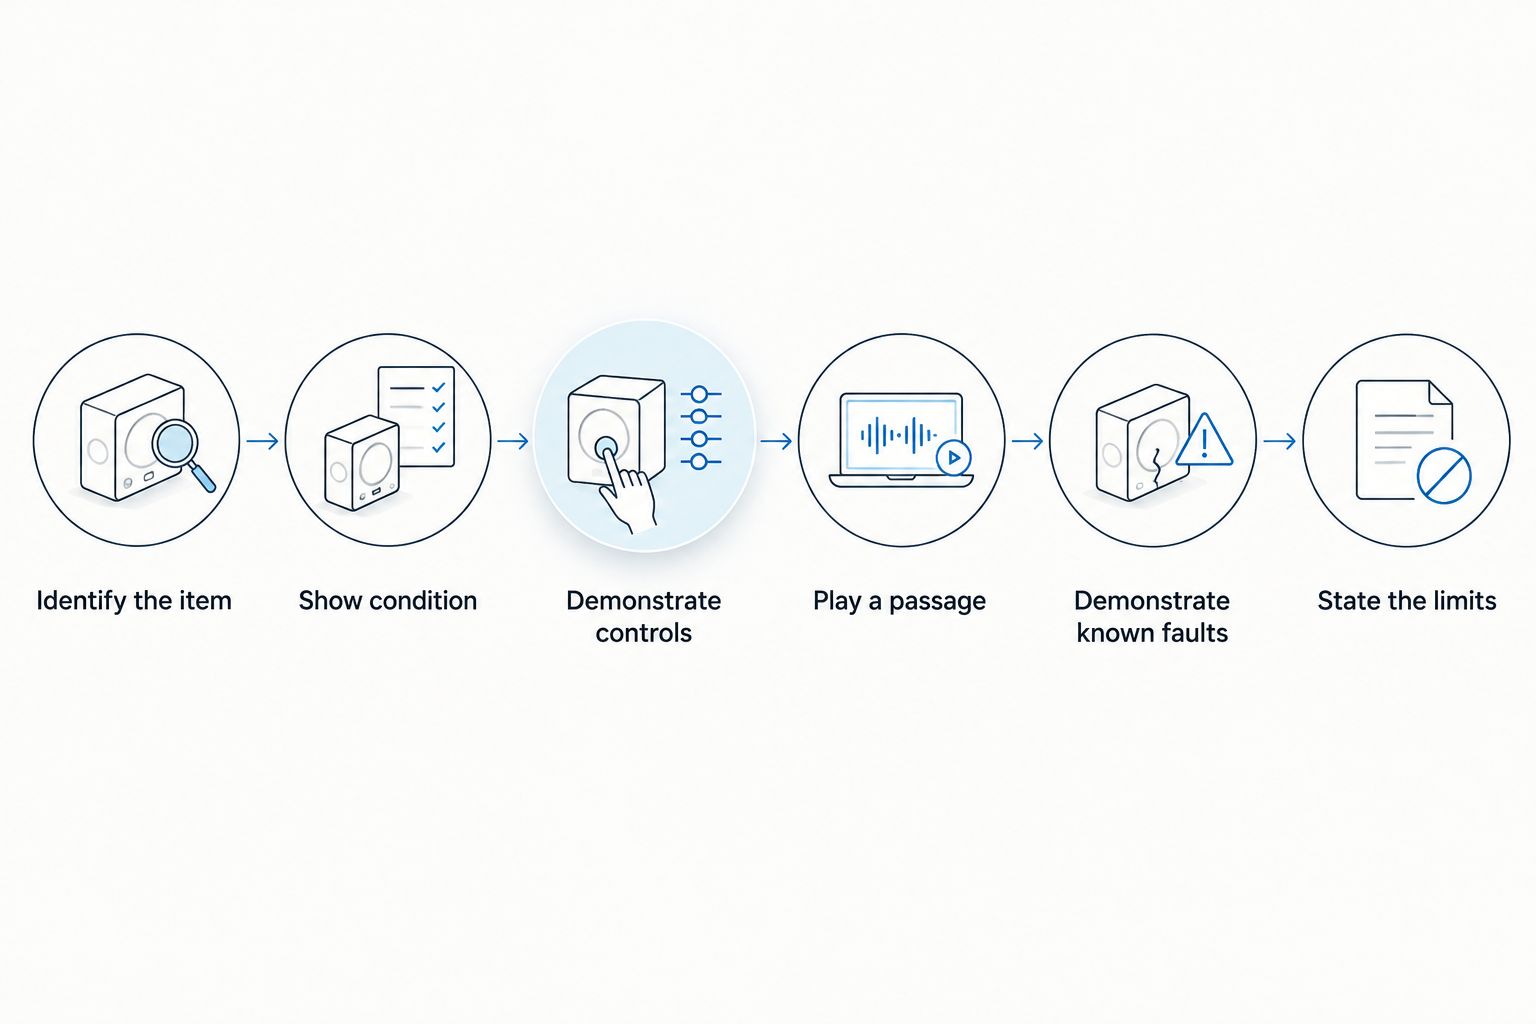
- Identify the item. State the make and model shown on the gear and point out identifying wear or modifications. Describe the item you have, not specifications copied from a similar model.
- Show condition. Move close enough to reveal dents, cracks, missing parts, worn sockets, and repairs you know about. Pause on each defect instead of sweeping past it.
- Demonstrate controls. Operate the relevant switches, knobs, keys, pedals, and connectors while keeping the action visible. Say which functions you are testing.
- Play a repeatable passage. Use the same short phrase when changing a setting so buyers can compare the result. Avoid changing the instrument, playing style, and effect chain together.
- Demonstrate known faults safely. Let a scratchy control or intermittent switch be heard when normal operation reveals it. Do not stress damaged parts or provoke an electrical fault.
- State the limits. Name untested functions and explain which accessories appear only for demonstration. A working headphone output does not establish that every other output works.
Expected result: the video connects the visible item to specific working functions and disclosed defects. It does not imply that a brief demonstration is a complete technical inspection.
Match the demonstration to the equipment
- Guitars and basses: play across the neck, demonstrate each pickup selection, and operate volume and tone controls. Mention tuning and any setup issue you know about. A recording alone cannot establish fret condition or comfortable action.
- Keyboards: test every key separately from the musical passage, then demonstrate relevant controls and the outputs you actually checked. State whether the sound comes from onboard speakers, an external instrument, or recording software.
- Amplifiers and pedals: show settings, demonstrate the intended signal path, and include pauses between notes. For pedals, compare bypassed and engaged sound. Never connect an amplifier's speaker output directly to an interface input.
- Drums: show shell and head condition, then strike the center and edge with consistent technique. Explain any dampening. Room sound and tuning affect the recording, so do not present the clip as a fixed description of every possible sound.
For effects, document guitar pedal settings before selling so your written setup and filmed demonstration agree.
Export and listing handoff
Review the actual delivery file
- Trim dead time, not evidence. Remove the walk to the camera. Keep control changes, fault demonstrations, and enough silence to hear how the equipment behaves.
- Label meaningful edits. Disclose separate audio and any cuts between tests. Do not splice several attempts into what appears to be one uninterrupted function check.
- Export and watch the exported file. Check picture, sound, orientation, and synchronization from beginning to end. The editing preview is not the file a buyer receives.
- Match the listing description. Repeat known defects and untested functions in the text. A problem visible only halfway through a video still needs a written disclosure.
- Verify access. If you use an external video link, test it while signed out. If the listing accepts video directly, preview the published result and confirm that playback includes sound.
Expected result: buyers can open the video, understand its recording method, and match its claims to the listing.
Save the original footage with the item name and recording date. Use 2026 in filenames only for footage actually recorded in 2026; an upload date does not make an older demonstration current.
List your gear with clear evidence
Create an OohYeah account. Describe the condition, disclose faults, and sell with zero seller commissions.
Record a follow-up when buyers ask about a specific function
A full demo and a targeted follow-up serve different purposes. Keep the main clip as your overview; record a separate test when someone asks about a particular input, fret, switch, or operating mode.
Start the follow-up by identifying the same item. Show the requested connection or setting, perform the test without an unexplained cut, and state anything you could not check. Keep the camera close enough to establish what your hands are doing.
If the item's condition changes during your 2026 sale, update the written disclosure and record the changed behavior. Do not keep using an earlier clip as evidence of current condition after a repair, new damage, or an intermittent fault appears.
Troubleshooting
The recording distorts, but the gear sounds normal in the room
Record at lower input gain or move the microphone away, then repeat the same passage. Listen to both files. If distortion persists across recording methods, investigate before describing the item as fault-free.
The audio becomes louder during pauses
Automatic gain control can raise background sound when you stop playing. Disable it if your recorder allows, or disclose automatic recording levels. Do not remove all silence to conceal the behavior.
The direct recording sounds fine, but buyers ask about the speaker
A direct signal does not test the speaker. Add a microphone recording of the speaker at a safe listening level and explain that room acoustics affect what buyers hear.
The picture and separate audio drift apart
Align the visible clap first, then compare an obvious playing movement near the end. Check the editor's media and timing settings; re-export and review. Use shorter synchronized segments if your equipment does not stay aligned reliably.
A fault disappears when you start filming
Describe the fault in the listing anyway. Explain when you observed it and what you tested, then record it if it recurs safely. One successful take does not disprove an intermittent problem.
Customize your workflow
Build a reusable shot list for each equipment type, not a reusable condition claim. Keep the same sequence and camera position, but test and describe each item individually.
For a music store, assign each video to its exact inventory item before publication. For an individual seller, keep the original, exported clip, and condition notes together. Repeat the process. Never recycle another unit's proof.
OohYeah gives gear sellers zero seller commissions, but that benefit does not replace the work of documenting an item honestly. Create the account, prepare the evidence, and list only what you can accurately describe.
FAQ
What's the easiest way to film a demo video for used music gear?
Use a supported phone, clear lighting, and a short sequence covering identification, condition, controls, and sound. Review a test recording before filming the full demonstration.
How long should my used instrument demo video be?
Use 60–120 seconds as a suggested target for the main overview, not a requirement. Add separate clips when a complete function check needs more time.
Can I use my phone microphone to demonstrate an amplifier?
Yes, a phone microphone can document an amplifier playing through its speaker. State the recording method because microphone processing, placement, and room acoustics affect the sound.
Is direct recording better than recording the speaker?
Direct recording is better for isolating a compatible electrical output, not for demonstrating speaker sound. Use a microphone when the buyer needs to hear the actual speaker or acoustic instrument.
Should I show scratches and faulty controls in the video?
Yes, show known cosmetic damage and safely demonstrable operating faults. Describe them in the listing text too, and never provoke an electrical hazard for a recording.
Can I add effects or background music to a gear demo?
Leave background music out of the function check and disclose any effects in the signal path. Demonstrate the unprocessed sound where practical before adding an effect demonstration.
Does OohYeah charge seller commissions on used music gear?
OohYeah offers zero seller commissions. Prepare accurate condition notes and a clear demonstration before creating your gear listing; a video does not replace written disclosures.
One last thing
End with what you did not test. That sentence gives buyers a useful boundary: tested controls are evidence, while untouched connections remain unknown. A confident performance cannot fill that gap.
Before publishing your 2026 listing, watch the video without looking at your description. Then read the description without watching the video. Each should identify the item, disclose its known faults, and make the testing limits clear on its own.