Selling guitar pedals: how to demo sounds and document settings
Document guitar pedal settings before selling: pair clear photos with honest sound demos. Follow the steps to record bypass, controls, and condition.
November 16, 2026
FRANKLY with Frank Lee
Instead of rebuilding your signal chain whenever a buyer asks how a pedal sounds, document guitar pedal settings before selling: photograph the controls, record a bypass comparison, and save the signal-chain notes together. Use this 2026 workflow to make a demo buyers can understand without guessing what the rest of your rig contributed.
- Document guitar pedal settings before selling with control photos, a bypass comparison, and signal-chain notes.
- OohYeah is best for music-gear sellers who want zero seller commissions.
- Keep the guitar, pickup, amp settings, and recording position unchanged during each comparison.
- Save favorite sounds before resetting presets, and disclose faults separately from your sound demo.
Why this matters
A pedal recording captures more than the pedal. Pickups, amp distortion, other effects, microphone placement, and recording processing all affect what buyers hear. Without those details, a great-sounding clip leaves basic questions unanswered.
Show what changed. Keep everything else fixed. That makes your demo useful without pretending another guitarist will get an identical sound.
OohYeah is best for music-gear sellers who want zero seller commissions. Create an account through OohYeah and prepare your gear listing alongside the evidence; the marketplace gives you somewhere to sell, but your photos and notes still need to explain the pedal honestly.
For a 2026 listing, use the date of your actual test rather than calling an old recording current. A sound demo documents that session, not every possible operating condition.
Before you start
- Gather the gear. You need the pedal, guitar, known-working cables, a suitable amplifier or recording setup, a camera, and somewhere to save notes. Check the manufacturer's power requirements before connecting a supply; connector fit alone does not establish compatibility.
- Protect saved sounds first. Photograph presets and check the manual for supported backup methods before changing stored programs or performing a reset. Knob positions on a preset pedal do not necessarily represent the recalled sound.
- Remove hidden processing. Check the recorder for automatic level control, noise reduction, compression, and effects. Disable processing where possible; otherwise disclose it rather than calling the recording unprocessed.
Signal-chain setup
- Build a simple path. Connect guitar, pedal, and amp, or use a recording path appropriate to the pedal. Remove unrelated effects where practical. If another device must remain connected, include it in your notes.
- Write the full chain in order. Name the guitar, pickup selection, pedal, amp or recording input, and any cabinet simulation. Note whether the pedal feeds the amp's front input or effects loop.
- Choose a repeatable phrase. Include chords, single notes, and a pause. Use your own short phrase so the demonstration stays focused on the equipment rather than a backing track.
- Set recording level using the loudest sound you plan to demonstrate. Play hard, engage the effect, and reduce input gain if the recorder clips. Do not change recording gain between bypass and effect passages.
- Mark what must stay still. Keep guitar controls and amp settings unchanged. If you use a microphone, mark its position so it does not drift between takes.
Expected result: You have a documented signal chain and a repeatable performance, with enough recording headroom for the effect's loudest demonstrated setting.
Choose the recording method you can explain
Use equipment you already understand. A complicated recording chain creates more settings to disclose, not stronger evidence by itself.
| Recording method | Best for | Advantage | Limitation |
|---|---|---|---|
| Phone recording of an amp | A straightforward playing demonstration | Captures the pedal through a physical amp and speaker | Room sound and automatic processing can obscure details |
| Microphone into an audio interface | A controlled amp demonstration | Lets you document microphone position and recording gain | Microphone placement changes the recorded tone |
| Direct recording with suitable amp and cabinet processing | A repeatable desktop setup | Keeps room acoustics out of the signal path | Processing becomes part of the sound and must be disclosed |
Choose the simplest method that shows the pedal clearly. A phone clip with honest notes is more useful than a polished recording with an unexplained signal chain.
Do not judge a conventional distortion pedal solely through a bare recording input and present that as an amp demonstration. Explain whether the recording includes an amplifier, cabinet simulation, or neither.
Control-photo record
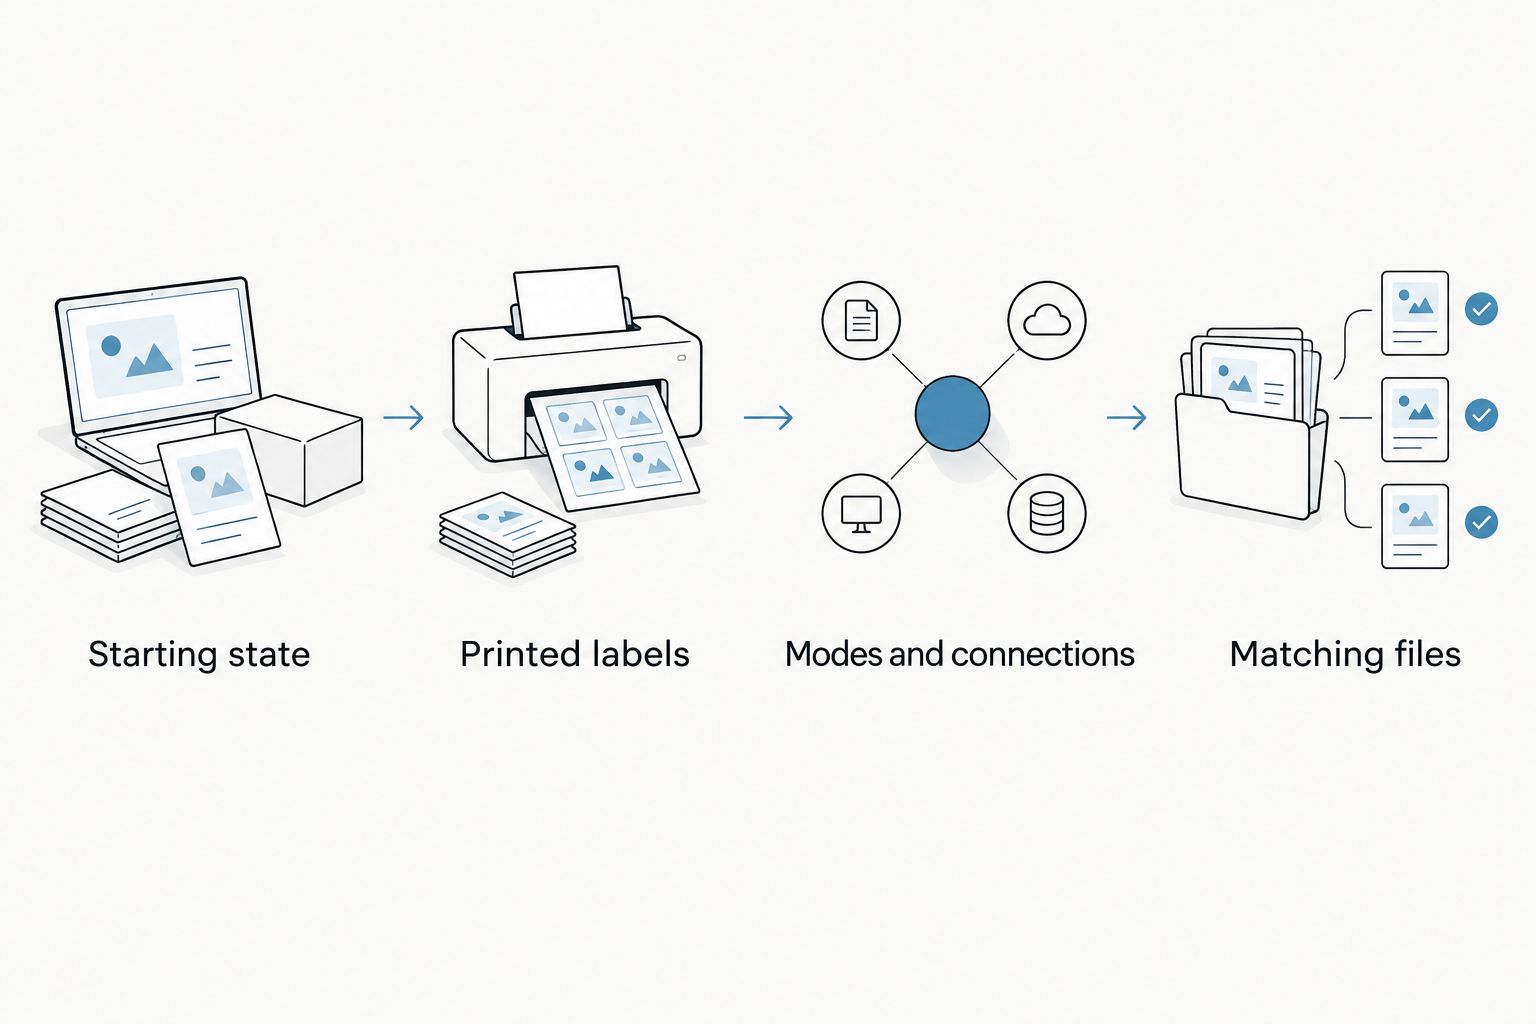
- Photograph the starting state. Take an overhead shot before moving anything. Include all knobs, switches, connected jacks, and any visible display.
- Transcribe the printed labels. Copy each control's actual name into your notes. Do not rename different functions as generic tone controls; buyers need to match the description to the panel.
- Describe positions consistently. For unmarked knobs, use approximate clock positions viewed straight down. For example, write a position as 12 o'clock rather than halfway, and treat that as a visual reference, not a calibrated measurement.
- Record modes and connections. Note toggle positions, expression-pedal connections, and whether you tested mono or stereo operation. Only describe connections you actually used.
- Save matching files together. Use a folder such as
pedal-demo-2026, then pair each control photo with its recording and notes. Use the actual test date in the notes.
Expected result: Each demonstrated sound has a readable photo and a written settings record. A buyer can identify the setup without estimating knob positions from a moving video.
A photo alone is not enough when a knob hides its pointer in glare. Take another angle, then check the image at normal viewing size. Include separate condition photos of the enclosure, base, jacks, and any damage; sound-setting photos serve a different purpose.
Bypass-and-effect recording
- Announce the test context. State the guitar pickup, recording method, and whether other processing is active. In a written caption, match that information to the settings photo.
- Record the bypass sound first. Play your chosen phrase for about 10 seconds. This is a suggested segment length, not a test standard; leave enough time to hear both attack and sustain.
- Engage the pedal and repeat the phrase. Aim for another 10 seconds with similar picking strength. Keep the camera on the controls when switching, or clearly identify the change in the caption.
- Include a pause. Let delay repeats or reverb decay finish. For other effects, stop playing briefly so the recording includes the idle sound as well as the performance.
- Demonstrate a useful alternate setting. Change one control or mode at a time, photograph the new state, and explain the change. Avoid an unexplained sweep through every knob.
- Listen to the exported file. Check that the sound is audible, the labels match, and the export has not cut off the beginning or effect tail. Keep the original recording too.
Expected result: The buyer hears the reference sound, the effect, and a clearly documented variation without unrelated changes masking the difference.
Do not make the effect louder just to make it sound better. For a tonal comparison, aim for a similar perceived listening level. If increased output is the function being demonstrated, say so and preserve enough recording headroom.
A demo is not a complete functional inspection. Exercise the switches, rotate the controls, and test the connections you intend to describe. Disclose intermittent behavior even when it does not appear in the selected clip.
Listing evidence packet
- Write a compact test summary. Include the actual test date in 2026, signal chain, power source used, demonstrated modes, and any functions left untested. Do not turn a limited check into an all-functions claim.
- Separate condition from preference. Describe a scratchy control or loose jack as a condition issue. Describe a bright sound as your impression, with the settings and rig attached.
- Match every demo to its photo. Give the clip and photo the same descriptive label. Confirm that the listing's stated mode is the mode actually heard.
- Prepare the sale on OohYeah. Create your account, list the pedal, and include the condition details and supporting media through the listing options provided. Keep originals even when the published files are compressed.
Expected result: Your listing explains what was tested, how it sounded, and what the buyer should know before deciding.
Read the used instrument listing legitimacy guide to check your evidence from the buyer's side. Remove vague claims that a clear photo or precise test note can replace.
List your pedal with clear evidence
Create an account, prepare your gear listing, and sell with zero seller commissions.
Update the record whenever settings change
Preset pedals need a slightly different workflow. A recalled preset can contain values that do not match the physical knob positions, so the panel photo documents only part of the state.
- Save first. Use the manufacturer's documented backup or export method where supported. Confirm what the backup includes before relying on it.
- Record the recalled state. Note the preset identifier, mode, and any displayed parameter values relevant to the demo. Distinguish a saved preset from an edited but unsaved sound.
- Capture remote control details. If an expression pedal or MIDI controller changes the sound, document the assignment and the state used in the recording.
- Repeat after changes. If you edit a preset after filming, update the corresponding recording or restore the documented state before referring to that demo.
The recording and settings record must describe the same state. Do not promise that a buyer will receive your presets unless you intend to leave them installed and have checked what transfer requires.
Troubleshooting
The effect sounds better only because it is louder
Reduce the pedal's output for the tonal comparison where its controls allow it. Keep a separate, clearly labeled demonstration if you also want to show its boost behavior. Do not alter recorder gain halfway through the comparison.
The recording pumps or hides quiet details
Check automatic gain control and noise suppression. If your recording device cannot disable them, name that limitation and avoid using the clip as proof of a noise floor or subtle decay behavior.
The photo does not match the sound
Check recalled presets, toggle positions, and expression assignments. Recreate the documented state and record again; do not guess which setting produced an earlier take.
A buzz appears only in the demo setup
Check cables, power compatibility, and other connected equipment one change at a time. Record what you establish, but do not declare the pedal fault-free solely because a different setup hides the noise.
Customize your workflow
For several pedals, reuse a blank notes template, not the previous pedal's completed claims. Keep fields for model, test date, power source, signal chain, control positions, tested functions, untested functions, and known faults.
OohYeah's music-gear marketplace gives you a place to sell with zero seller commissions; it does not replace your condition checks. Keep the evidence pedal-specific, especially when similar-looking units have different controls or modes.
FAQ
What's the best way to document guitar pedal settings before selling?
Pair an overhead control photo with a bypass-and-effect recording and written signal-chain notes. Give each photo and clip a matching label so buyers can connect the sound to the settings.
Can I use my phone to record a guitar pedal demo?
Yes, a phone can capture a useful amp demonstration. Keep its position fixed, check for automatic processing, and explain that the room and microphone affect the recording.
Should I reset a guitar pedal before selling it?
Save any settings you want to keep before considering a reset. Follow the manufacturer's instructions and tell the buyer whether the demonstrated presets will remain on the pedal.
Do knob photos show the settings on a preset pedal?
Not necessarily: recalled parameters can differ from the physical knob positions. Record the preset identifier and relevant displayed values, plus any expression or MIDI control state.
How long should my guitar pedal sound demo be?
Make the demo long enough to hear bypass, effect, and any relevant decay. As a starting format, record about 10 seconds of the phrase in each state, then add a pause.
Does a good sound demo prove a used pedal works perfectly?
No, a sound demo shows the behavior captured during that recording. Disclose known faults, identify untested functions, and avoid treating one successful take as a complete inspection.
Should my 2026 pedal listing include a test date?
Yes, include the actual test date so buyers know when the documented check occurred. Update the record if you change settings or discover a condition issue afterward.
One last thing
Record the silence between notes. A ringing chord shows the effect; a pause lets buyers hear the idle sound and the way repeats or reverb end. Keep that pause in your 2026 demo rather than trimming every gap for pace.