Your Guide to a Perfect Sample Stage Plot
Create a professional sample stage plot that gets you a better soundcheck. Our guide offers actionable tips and real-world examples for musicians and bands.
December 17, 2025
Music Marketplace Advisor
Buying & SellingA sample stage plot is your band's secret weapon for a smooth gig. It’s essentially a map that tells the venue’s crew exactly where each musician and their gear will be on stage. Think of it as the blueprint for your live show—it gets everyone on the same page long before you hit the first note.
Why a Clear Stage Plot Is Your Most Important Tool
Picture this: you walk into a venue you've never played before. The house sound engineer is staring down a packed schedule and needs to get your band set up, like, yesterday.
Without a stage plot, it’s chaos. You're shouting over your bandmates trying to explain where the amps go, what mics you need, and who needs a monitor wedge. But with a good stage plot? The engineer already has a clear picture. They know precisely where the singer stands, where the drum kit needs to live, and exactly how many monitor mixes you’ll need.
This single document is the most critical conversation you'll have before the show. It clearly lays out all your technical needs, cutting down on confusion and saving a ton of time during soundcheck. For a festival gig with a brutal 15-minute changeover, a solid plot is the only thing standing between a seamless set and a total trainwreck.
The Professional Advantage
When you send over a clean, professional stage plot, you’re telling the venue you’re serious and know what you're doing. It immediately builds respect with the crew and sets the right tone for the gig. This isn't just about being organized; it’s a core part of being a working musician. In fact, mastering these details is a huge piece of the puzzle when you’re figuring out https://oohyeah.app/posts/how-does-the-music-industry-work.
The industry has definitely taken notice. The market for stage plot builders was valued at a cool $145 million in 2024 and is expected to balloon to $412 million by 2033. Why? Because they make everything more efficient. Over 70% of professional touring acts have gone digital with their plots, and it’s paying off—some are cutting their load-in times by as much as 30%.
More Than Just a Diagram
A great stage plot does more than just show where the drummer sits. It's a key communication tool that ensures your band, the FOH engineer, and the monitor tech are all working from the same script.
Before we dive into how to build one, let's look at the absolute must-have elements. Every component tells the tech crew a critical piece of information they need to do their job right.
Essential Stage Plot Components
| Component | What It Communicates | Why It Matters |
|---|---|---|
| Stage Layout | The physical placement of all musicians and large equipment (amps, drums). | Helps the crew pre-set the stage and run cables efficiently before you even arrive. |
| Input List | A numbered list of every single sound source (vocals, guitar, kick, etc.). | This is the master list for the audio engineer to patch everything into the mixing console. |
| Mic/DI Needs | The specific type of microphone or DI box needed for each input. | Ensures the right gear is used for the right instrument, which is crucial for good sound. |
| Monitor Mixes | Where monitor speakers are needed and who needs what in their mix. | A good monitor mix is everything for a confident performance. This avoids guesswork. |
| Power Drops | Where you need access to electrical outlets for things like pedalboards or amps. | Prevents last-minute scrambles for extension cords and power strips. |
Having these details nailed down shows you've thought through your setup and respect the crew's time.
A well-crafted stage plot eliminates guesswork. It allows the technical team to anticipate your needs, pre-set microphone stands, run the correct cables, and have everything ready for a seamless soundcheck. It’s the ultimate sign of a professional musician.
Ultimately, putting in the effort to create a quality plot shows you respect the venue's staff and their expertise. For anyone serious about their performance, understanding the full scope of staging the event is non-negotiable.
Gathering Your Band's Technical Information
Before you even think about dragging an icon onto a digital canvas, you need a full inventory of your band's setup. This is the grunt work, but it’s absolutely essential. We're not just talking about who plays what instrument; we need to get into the nitty-gritty technical details that a sound crew lives and dies by.
Think of it this way: your stage plot is the blueprint for your live show. The more detailed and accurate your information is, the smoother your soundcheck will be. A vague plot just creates guesswork for the house engineer, and that's a recipe for delays and a stressed-out crew. Your goal is to hand them a document so clear they could have most of the stage ready before you even walk in the door.
Building Your Master Input List
First things first, you need to build a comprehensive input list. This is essentially a numbered list of every single thing on stage that makes a sound and needs a microphone or a line plugged into it. This list is the FOH engineer's bible for patching the stage into the mixing console.
You have to be almost painfully specific here. "Drums" doesn't cut it. You need to break it all the way down.
- Channel 1: Kick Drum
- Channel 2: Snare Top
- Channel 3: Hi-Hat
- Channel 4: Rack Tom
- Channel 5: Floor Tom
- Channel 6: Overhead Left
- Channel 7: Overhead Right
See the difference? That level of detail is non-negotiable. Do this for everyone. The lead singer needs a vocal mic. The acoustic guitar probably needs a DI box. The electric guitar amp needs its own mic. Each one of those is a separate input and gets its own line on the list. Don't leave out backing vocalists, keyboards, or that laptop running your backing tracks.
Defining Monitor Mixes and Power Needs
With your inputs locked down, it's time to figure out monitors. This part of the plot tells the monitor engineer what each performer needs to hear to play their best. Trust me, everyone has their own preference.
Be crystal clear about how many separate monitor mixes you'll require and who gets which mix. For instance, your singer will want their vocal front and center in their wedge, but the drummer might need a heavy dose of kick and bass to stay in the pocket. If anyone in the band uses in-ear monitors (IEMs), that's a huge piece of information, as it changes how the engineer routes signals from the board.
One of the most common—and easily avoidable—mistakes is forgetting about power. Make a note of every single spot on stage that needs an electrical outlet. We're talking pedalboards, laptops, keyboard rigs, and any powered amps. Nothing brings a soundcheck to a screeching halt faster than the guitarist realizing their massive pedalboard is ten feet from the nearest outlet.
Finally, you need to clearly spell out your backline. This is simply the gear you’re bringing versus what you're hoping the venue will provide. Detail the specific amps you're using, the full size of the drum kit, and any other significant pieces of equipment. If you need the venue to provide a specific bass amp or a certain number of music stands, list it here. This helps the production manager plan for stage space and makes for a much smoother changeover between bands. When you gather all this information up front, your stage plot goes from a simple diagram to a genuinely useful tool for any crew you work with.
Designing a Stage Plot That Everyone Understands
Alright, you’ve gathered all your tech specs. Now it’s time to translate that wall of text into a visual map that a sound engineer or stage manager can decipher in a glance. Remember, the goal here is clarity, not a masterpiece for the Louvre. A cluttered or confusing stage plot is worse than no stage plot at all.
You don't need to be a graphic design whiz to pull this off. There are some fantastic tools out there that make it incredibly simple.
- Purpose-Built Apps: Tools like StagePlot Pro or the straightforward Stageplot.com are designed for exactly this. They come loaded with libraries of universal icons for mics, amps, instruments, and monitors that you can just drag and drop.
- General Design Tools: If you’re already comfortable with a platform like Canva, it works great too. It takes a little more legwork to find or create the icons, but it gives you total control over the layout and text.
The secret is to stick to simple, universally understood symbols. A circle with an 'X' in it is the classic symbol for a vocal mic. A rectangle is an amp. Using these conventions means any pro crew, anywhere, will know exactly what they’re looking at.
The Anatomy of a Clear Layout
First things first: orient your map. Always start by drawing a line at the bottom of your diagram and labeling it "FRONT OF STAGE" or "AUDIENCE." This is a non-negotiable. It immediately tells the front-of-house (FOH) engineer how to view the setup from their perspective at the mixing desk.
From there, start placing each band member and their key pieces of gear in their stage positions. This is where labeling becomes critical. Don't just drop in a bass amp icon; label it "Jen - Bass & Vocals." This small detail connects the gear to a person, which is incredibly helpful for the crew when they’re trying to sort out monitor mixes or troubleshoot an issue.
This flowchart shows how the information should flow from your lists into the visual design.
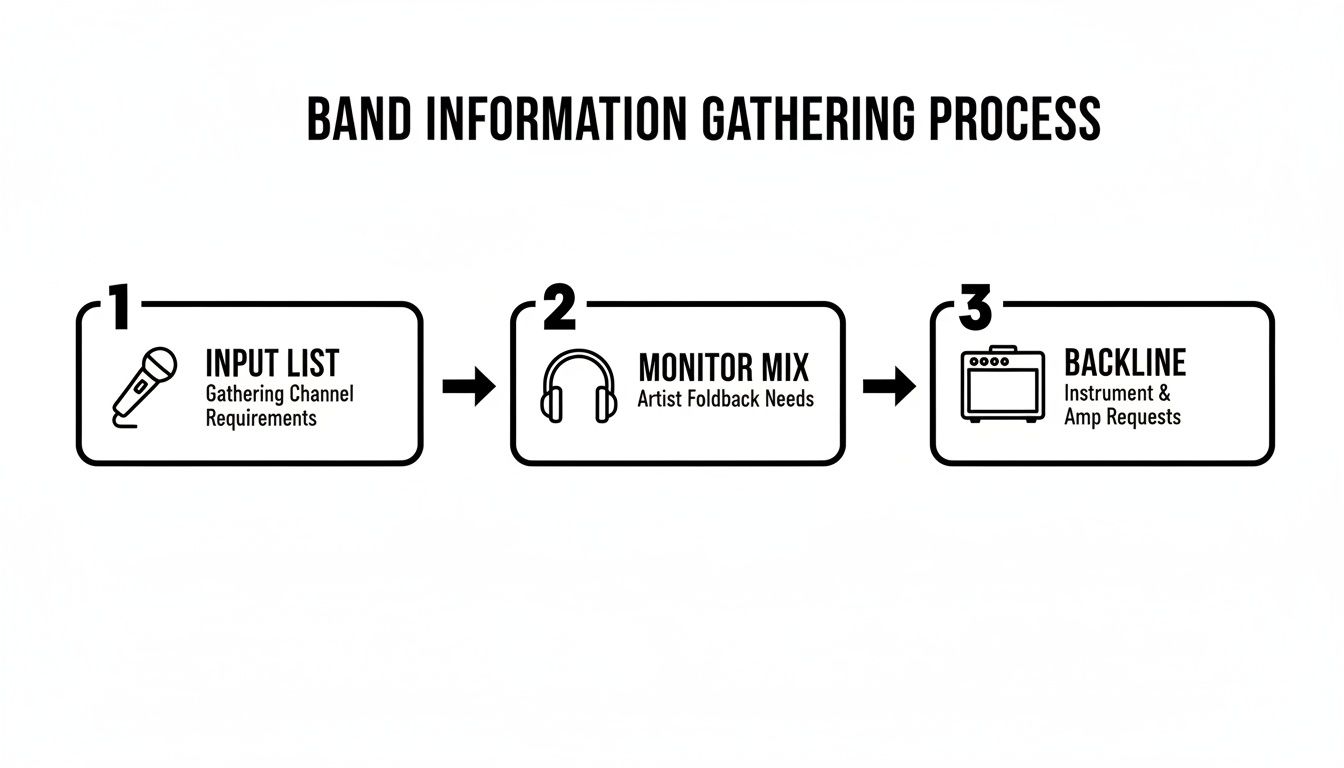
Thinking about it in these three distinct buckets—inputs, monitor mixes, and backline—is a great way to ensure you don’t miss any crucial details as you're building the diagram.
Putting It All Together
Let's think about a real-world example. A stage plot for a standard 4-piece rock band will be pretty busy. You'll have a full drum kit in the back, multiple amps across the stage, and several vocal mics up front, all requiring careful placement.
Contrast that with a plot for a solo acoustic artist. Theirs might just show a single stool, one vocal mic, an acoustic DI box, and a single monitor wedge. The level of detail directly matches the complexity of the performance.
Pro Tip: Clarity trumps complexity, every single time. A simple, black-and-white diagram with clear, bold labels is far more useful than a detailed, color-coded work of art that’s impossible to read in the dim light of a stage. The engineer needs fast information, not an art project.
The move toward digital plots has had a huge impact beyond just making things easier for bands. These documents are vital for safety and efficiency in the massive Stage Rigging System market. In fact, a 2024 study found that in North America, 60% of the 5,000+ major annual concerts now rely on digital stage plots that feed into rigging software. The result? A 25% drop in setup errors. To see how deep this goes, you can learn more about stage rigging system findings.
It all comes back to a simple truth: a great stage plot is all about effective communication.
Finalizing and Sharing Your Plot Like a Pro
You’ve done the hard work of creating a clear, detailed stage plot. That’s a massive step, but its real value comes down to one last thing: getting it into the right hands, the right way. A perfect plot that’s unreadable or never seen by the sound engineer is completely useless.
This final mile is where you truly lock in your reputation as an organized, easy-to-work-with band.
First things first: always, always save and share your stage plot as a PDF. Don't even think about sending an editable file like a .docx, .pages, or a proprietary file from a design app.
PDFs are the universal standard for a reason. They lock in your formatting, fonts, and layout, ensuring your plot looks exactly the same on the production manager's screen as it does on yours. This one simple step prevents your carefully arranged diagram from turning into a jumbled mess of misplaced text and icons on their end.
Naming and Labeling for Success
File names matter more than you’d think. Imagine being a venue’s production manager juggling a dozen bands for a festival. A file named "stageplot.pdf" is practically guaranteed to get lost in the chaos of their downloads folder.
Do yourself (and them) a favor and adopt a simple, professional naming convention.
A foolproof format is: YourBandName_StagePlot.pdf
So, a file named "TheWanderers_StagePlot.pdf" is instantly identifiable and easy to search for. It’s a small touch, but it screams professionalism and shows you respect the crew’s time and workflow.
Beyond the file name, the plot itself needs to have your key info printed directly on the document. Make it prominent and easy to find—usually right at the top of the page.
- Band Name: Big and bold. No confusion.
- Primary Tech Contact: The name and cell number of the one person the crew should call with questions.
- Date of Last Update: A simple line like "Updated: May 2024" is crucial. It reassures the crew they have the most current version of your setup.
These details are your professional signature. They signal to the venue that you're an experienced act that has its act together, building trust and goodwill long before you load in the first piece of gear.
This professional polish transforms your stage plot from a simple request list into a powerful communication tool. By making sure it’s accessible, clearly labeled, and has all the necessary contact info, you're paving the way for a smooth, efficient, and successful show. It's the final touch that separates the amateurs from the pros.
Communicating Effectively with Venues and Engineers
Your stage plot is more than just a piece of paper (or a PDF). It’s your first handshake with the venue's tech crew, and how you present it can set the tone for the entire gig. Getting this communication right from the start is the difference between a smooth soundcheck and a night spent chasing technical gremlins.
The key is to build a good working relationship before you even load in your first piece of gear.
The First Contact: When and How to Send Your Stage Plot
So, when’s the right time to send over your stage plot and tech rider? The moment the gig is confirmed. Seriously, don't wait.
Sending it weeks or months in advance gives the production manager or house sound engineer plenty of time to look over your setup. They can spot potential issues, ask clarifying questions, and make sure they have what you need ready to go. It’s a simple sign of professionalism that shows you respect their time and workflow.
When you hit send, keep the email short and to the point. A subject line like "Stage Plot/Tech Rider - [Your Band Name] - [Date of Show]" is perfect. Attach your files as PDFs, write a brief, friendly message, and you're done. A quick follow-up a week or so before the show is a good touch, but there's no need to hound them. A pro-level, low-maintenance approach will be appreciated.
This isn't just about being polite; it's about efficiency. The Event Stage Design Service market is projected to hit USD 3.62 billion in 2024, largely because venues and artists are seeing the value in solid pre-production. In fact, by 2023, 85% of promoters had adopted digital stage plots, which helped cut miscommunication errors by a massive 45%. Better planning has also been shown to trim labor costs by around 20%—a huge deal in today's industry. Discover more insights about the event stage design market and its growth.
"Your stage plot is your ideal setup, not a list of demands. The sound engineer knows their room and their gear better than you do. Arrive with a collaborative spirit, ready to adapt, and you'll find they are your biggest ally in making you sound incredible."
Remember, this first email is a form of networking. Being the band that’s organized and easy to work with gets you remembered for the right reasons, which can lead to more opportunities down the road. For more on this, check out our guide on why networking is important in the music industry.
Your Day-of-Show Attitude
When you walk into the venue, your attitude is everything. Your stage plot was the introduction, but your in-person vibe seals the deal.
The first thing you should do is find the house engineer. Introduce yourself, shake their hand, and just ask, "Hey, did you get a chance to look over our plot? Any questions?" This opens the door for a collaborative conversation.
Be ready to be flexible. The real world of a venue rarely matches the perfect world of your diagram. Maybe they don't have that specific vocal mic you love, or the stage is a little tighter than you expected. That's perfectly normal. Your plot is the starting point, not an unbreakable contract.
Most importantly, listen to the engineer. They work in that room night after night and know its every quirk. If they suggest shifting an amp to kill a nasty feedback frequency or using a different DI box, trust them. They're not trying to make your life difficult; they're trying to make you sound as good as possible. Treat them like a partner, and they will work their tail off for you.
Answering Your Top Stage Plot Questions
As you start putting together your own stage plot, you'll probably run into a few questions. That's a good thing—it means you're thinking through the details that make for a smooth show. Let's tackle some of the most common ones I hear from artists.
Stage Plot vs. Input List: What's the Difference?
This one trips up a lot of people. While you should always send them together, a stage plot and an input list are two distinct documents.
Think of your stage plot as the visual map—it shows the sound engineer where everyone and everything physically goes on stage. The input list, on the other hand, is the technical spreadsheet. It's a channel-by-channel breakdown of what gets plugged into the mixing board, like "Channel 1: Kick In - Beta 52a."
So, the plot shows the where, and the input list details the what. Both are essential.
How Often Should I Update My Stage Plot?
The short answer? Immediately. Anytime your setup changes in a meaningful way, your plot needs to reflect it.
- Did you add a new band member? Time for a new plot.
- Switching from wedges to in-ear monitors? That's a huge change for the monitor engineer, so update it.
- Got a new amp or added another keyboard to your rig? The crew needs to know.
Even if your setup stays exactly the same for a year, it's a good habit to give it a quick review every six months or so. Make sure your contact info is still correct and add a "Last Updated" date right on the document. This simple step tells the venue they're looking at the most current version.
You can find more tips and answers to common artist questions on our comprehensive FAQ page.
Is a Hand-Drawn Plot Okay?
Look, a clear, well-drawn plot on a napkin is better than no plot at all. But in today's world, a digital plot is the undisputed professional standard.
Digital plots are just easier for everyone to read, share, and archive. It also sends a clear signal to the venue's team that you're organized, prepared, and serious about your craft. With plenty of free and easy-to-use tools out there, there’s really no reason not to go digital.
The biggest mistake I see is sending a plot that's just flat-out wrong or incomplete. Things like unclear icons, forgetting to label who is who, missing contact info, or—the worst—sending an old, outdated version. Another pitfall is being too rigid. Remember, your plot is your ideal setup, but you have to be ready to adapt to the realities of the stage you're on.
Taking a few minutes to create a clean, professional document shows respect for the crew's time and sets the stage for a great show before you even load in.
At OohYeah, we're committed to giving artists the tools and knowledge to succeed. From mastering your stage presence to managing your music sales, our platform is built to support your entire creative journey. Learn more about how OohYeah can empower your career.