A Pro Guide to Organizing Your Music for Artists
Stop wasting time searching for files. Learn a professional system for organizing your music, from folder structures and metadata to backups and release assets.
December 4, 2025
Music Marketplace Advisor
Buying & SellingA messy hard drive is a musician's worst enemy. We’ve all been there—scrambling for the right final master, confusing "Final_v2" with "Final_Master_REAL," and wasting precious creative energy on digital housekeeping. Before you can even think about releasing your music, you need a bulletproof system for organizing your files.
This isn't just about being neat. It's about building a professional foundation for your career that saves you from headaches, lost files, and stressful release days. Let's build a digital archive that's logical, scalable, and keeps everything exactly where it needs to be.
Building Your Digital Music Archive From the Ground Up
The goal is simple: create a single source of truth for your entire catalog. When you need a specific stem, the instrumental version of a track, or a high-res press photo, you should be able to find it in seconds. This blueprint will give you a professional-grade structure that keeps your creative projects, final masters, and promotional assets neatly separated.
The Foundational Folder Structure
First things first, create a single master folder on your main hard drive or cloud storage. Call it "MUSIC" or "[YourArtistName] - Music". This is the home for your entire musical world.
Inside this main folder, create three essential subfolders. This simple hierarchy is the key to ending digital chaos for good.
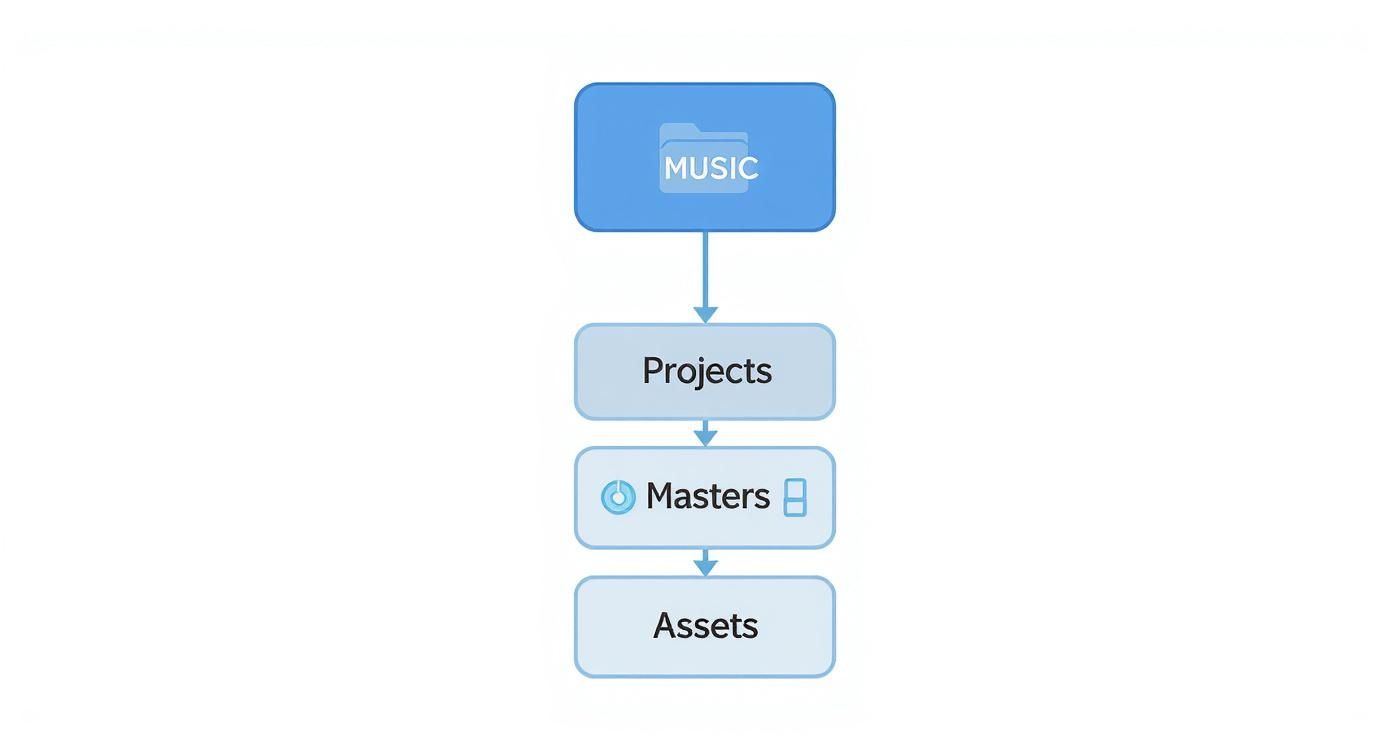
This structure immediately tells you where every file should live, preventing your Ableton project files from getting mixed up with the final masters you send to distributors.
These core folders are:
- Projects: This is where your creative work happens. Every Digital Audio Workstation (DAW) session—whether it's Ableton, Logic, or FL Studio—lives here.
- Masters: This folder is sacred. It contains only the final, approved, high-resolution audio files (WAVs or AIFFs) that are ready for the world. No works-in-progress allowed.
- Assets: This is for everything else that isn't audio. Think album artwork, press photos, logos, social media graphics, and your artist bio.
By separating your work into these three distinct categories from the start, you eliminate the main source of digital clutter. You'll never again have to second-guess whether
Track_Final_Final.wavis actually the one to upload.
A Naming Convention That Works
With your folders in place, the next crucial step is a consistent file naming convention. Ambiguity is the enemy here. A file name should be a clear label, not a mystery. A professional standard eliminates the guesswork for you, your collaborators, and any future team members.
I've found a simple, powerful formula that works every time:ArtistName_TrackTitle_MixType_Version_Date.wav
Let’s see it in action. A real-world example would look like this:TheCurrents_ChasingLight_Master_v1_20250915.wav
Instantly, you know the artist, the song, that it's the final master, it's the first version, and when it was exported. Applying this logic to your project files, stems, and even artwork creates a system that’s universally understood across your entire archive. As you get more advanced, you can even look into automating manual processes to boost efficiency and save time, which is a huge help for repetitive tasks like renaming files.
This kind of groundwork is non-negotiable for a smooth release. In fact, a clean workflow is a cornerstone of the best practices for releasing new music online, because it makes every step that follows—from tagging metadata to uploading to platforms like OohYeah—infinitely easier.
Mastering Your Music Metadata for Professional Releases
https://www.youtube.com/embed/8mPvNpeX8pw
If a clean folder structure is your internal map, then your metadata is the public-facing GPS for your music. It's all the information embedded within your audio files that tells streaming platforms, royalty societies, and listeners who you are and what they're hearing.
Getting this stuff wrong is a silent career killer. It leads to misattributed royalties, lost revenue, and your music getting completely lost in the digital ocean. Think of metadata as your track's digital birth certificate—it's that important for anyone serious about distributing their music professionally.
Decoding ISRC and ISWC: The Alphabet Soup of Royalties
Before you start tagging your files, you need to get your head around the two most important codes in the music industry. They sound technical, but they're the foundation of how you get paid.
- ISRC (International Standard Recording Code): This is a unique code assigned to a specific recording. If you have an album version, a radio edit, and an instrumental of the same song, each one gets its own ISRC. This code is what tracks streams and sales of that particular sound file.
- ISWC (International Standard Musical Work Code): This code identifies the underlying musical composition—the melody and lyrics. No matter how many different artists record your song, their versions all link back to the same ISWC, making sure the original songwriters get their royalties.
Your distributor, whether it's DistroKid or TuneCore, can usually assign ISRCs for you when you upload a track. The ISWC, however, comes from your Performing Rights Organization (PRO) like ASCAP or BMI after you register the work with them. Don't skip these steps.
This kind of meticulous tracking is more critical than ever. With global music streaming revenues pushing past US$20 billion for the first time in 2024 and making up 69.0% of all recorded music income, the stakes are high. Accurate metadata ensures you get your piece of that pie.
Embedding Essential Metadata Into Your Audio Files
Once you have your codes, it's time to embed this core information directly into your high-quality WAV or AIFF master files. Don't wait until you're uploading. Most DAWs have a function to export with metadata, or you can use a dedicated editor to get it done. This guarantees your information travels with the file, no matter where it goes.
Your metadata checklist should always include these key fields:
- Track Title: The official name of your song.
- Artist Name: Your primary artist name.
- Album/EP Title: The name of the collection this track belongs to.
- Genre: Be specific. Think "Indie Pop," not just "Pop."
- Composer(s): List every single songwriter credited on the track.
- Year: The year the track was officially released.
- Track Number: Its position in the album or EP sequence.
- ISRC: The unique code for this specific recording.
Making a habit of filling out these fields for every master file is a game-changer. It makes uploading to distributors way faster and dramatically cuts down on the risk of errors. For a deeper dive, check out our guide on how to optimize your music metadata for streaming platforms. This simple discipline turns a good organizational system into a professional, monetization-ready machine.
Managing Versions, Stems, and Master Files
Every song you create leaves a trail of digital breadcrumbs—demos, rough mixes, final versions, stems. Without a system, your hard drive can quickly turn into a chaotic mess of half-finished ideas and duplicates with confusing names. This is where getting serious about version control isn't just about being tidy; it's a fundamental part of being a professional artist.
Let's be real: a single misplaced file can be the difference between landing a sync deal and missing the opportunity entirely. Properly managing your track versions, stems, and master files future-proofs your catalog and prevents headaches you don't have time for.

Differentiating Between Track Versions
Most songs don't just exist as a single album cut. You’ll likely have radio edits, extended club mixes, instrumentals, or even a cappella versions. Each one is a unique asset, and they all need to be easily identifiable in your archive.
Shoving them all into one folder with names like "Track_NoVocals.wav" is a recipe for disaster. Instead, a clean and clear file naming convention is your best friend. I recommend adding a descriptive suffix to each file name.
For instance:
TheCurrents_ChasingLight_Instrumental_v1_20250915.wavTheCurrents_ChasingLight_RadioEdit_v1_20250915.wavTheCurrents_ChasingLight_Acapella_v1_20250915.wav
This simple habit means that when a music supervisor emails you asking for an instrumental on a tight deadline, you can find it and send it in seconds. That kind of reliability gets you noticed.
The Power of Well-Organized Stems
Stems are the individual groups of tracks from your session—think separate files for drums, bass, vocals, and synths. They are goldmines for remixes, live performances, and collaborations. Keeping them organized from day one is one of the smartest things you can do for your career.
Inside each song's "Project" folder, create a subfolder called "Stems." Once you've signed off on the final mix, bounce each major instrumental group as a high-quality WAV file into that folder.
Here’s a crucial tip I learned the hard way: always export your stems from the very beginning of the track (bar 1, beat 1), even if an instrument doesn't come in until later. This ensures all the files are the same length and line up perfectly when someone else drops them into a new project.
Your stem naming should follow the same logical pattern:
TheCurrents_ChasingLight_120bpm_Drums.wavTheCurrents_ChasingLight_120bpm_Bass.wavTheCurrents_ChasingLight_120bpm_Synths.wavTheCurrents_ChasingLight_120bpm_Vocals.wav
Notice the BPM is included? That's a pro-level detail that makes life infinitely easier for any remixer or collaborator. It’s small things like this that signal you know what you're doing.
A clear naming system is the bedrock of a professional music archive. Let's look at a quick comparison to see why it matters so much.
Table: Essential File Naming Conventions for Artists
| File Type | Poor Example (Avoid This) | Professional Example (Use This) |
|---|---|---|
| Final Master | final_mix_mastered.wav | Artist_TrackTitle_Master_48-24_20250915.wav |
| Instrumental | MySong_NoVox.wav | Artist_TrackTitle_Instrumental_v1_20250915.wav |
| Demo Version | song idea 2 new.mp3 | Artist_TrackTitle_Demo_v2_20250810.mp3 |
| Stem (Drums) | drums.wav | Artist_TrackTitle_120bpm_Drums.wav |
| Distribution MP3 | final FINAL song.mp3 | Artist_TrackTitle_Master_MP3-320.mp3 |
This table shows the difference between a messy, amateur approach and a clear, standardized system that saves time and prevents confusion for everyone involved.
Protecting Your Golden Copy: The Master Files
Think of your final master files as the crown jewels of your music library. These are the highest-resolution, officially approved versions of your tracks. They belong in your dedicated "Masters" folder and should be treated as sacred—never edited or overwritten.
A classic mistake is to constantly export new versions directly from your DAW whenever you need a different format. This opens the door for inconsistencies. The correct workflow is to create a single, pristine master file first and work from that.
My go-to process for master files:
- Export One Archival Version: Your first and most important export should be your "golden copy." This is typically a 24-bit, 48kHz (or higher) WAV file. This file gets archived and protected.
- Create Derivatives from the Master: Any time you need another format, like a 16-bit WAV for a CD or a high-quality MP3 for a promo email, always create it by converting a copy of that archival master.
- Label Formats Clearly: I keep these other formats in a "Distribution Formats" subfolder within the main "Masters" folder, with clear labels like
_MP3-320or_WAV-16bit.
By following this approach, you guarantee that every version of your song out in the world is derived from the same high-quality source. When you systematically manage every version, stem, and master, you're not just cleaning up a hard drive; you're building a professional music catalog that's ready for any opportunity, especially when preparing your uploads for platforms like OohYeah.
Organizing Your Visual Assets and Promotional Materials
Let’s be honest: your music is only part of the story. The visuals, the bio, the photos—all of it comes together to create your brand. When these assets are scattered across random hard drive folders and old email threads, it doesn't just create a headache for you; it can lead to missed opportunities and a brand that feels inconsistent.
Think of it this way: a professional artist treats their visual assets with the same respect they give their master recordings. It’s about building a central, easy-to-use hub for everything from album art to your latest press photos. When a blogger, promoter, or venue asks for your stuff, you want to send a polished, professional package in minutes, not spend hours digging for the right file.
Building Your Central Asset Hub
The first move is simple: inside your main music archive, create a top-level folder called “Assets.” This will be the command center for every non-audio file connected to your project. From there, you can build an intuitive structure that makes finding anything a breeze.
A solid, scalable folder system might look something like this:
- Artwork: This is where every version of your cover art for singles, EPs, and albums will live.
- Photos: All your official press shots and promotional images go here.
- Logos: High-resolution versions of your artist or band logo, ready for flyers or websites.
- Bio & Press: A home for your official artist biography, past press releases, and links to any cool media coverage.
- Social Media: This is a lifesaver. Keep pre-sized graphics, banners, and video clips for platforms like Instagram, TikTok, and YouTube here.
This approach is basically your own version of Digital Asset Management (DAM), a system that big companies use to keep their media libraries in check. Adopting this mindset, even on a smaller scale, brings a serious level of professionalism to your independent career.
By putting these principles into practice, you ensure every piece of your brand identity is cataloged and ready to go at a moment's notice.
Mastering Your Artwork and Photos
For many new listeners, your album art is the very first thing they’ll see. It’s your handshake, so it needs to be perfect for every platform. Start by creating a subfolder for each release inside your main “Artwork” folder.
Within each release folder, make sure you have multiple versions of the cover art saved and clearly labeled:
- High-Resolution (Print): A 3000x3000 pixel, 300 DPI TIFF or PNG. This is for any physical media or high-quality print features.
- Digital Master (Streaming): A high-quality JPG, also at least 3000x3000 pixels. This is the one you’ll upload to Spotify, Apple Music, and other DSPs.
- Social Media Squares: A 1080x1080 pixel JPG, optimized for Instagram and Facebook feeds.
This same level of detail should apply to your press photos. Always hold onto the original, full-resolution files from your photographer. But it’s also smart to create a subfolder with web-optimized versions—smaller files that are perfect for emailing to press or including in an electronic press kit (EPK).
The power of great visuals can’t be overstated. If you're thinking about your next release, it's worth taking a moment to understand why artists should invest in quality cover art to truly cut through the noise.
Creating the Ultimate Release Kit
Okay, this is the final piece of the puzzle. For every new single or album, you need to assemble a "Release Kit." This is a pre-packaged folder that contains everything a journalist, blogger, or playlist curator could possibly need. It’s your digital business card and press package all in one.
Your Release Kit should be a clean, shareable folder (using Dropbox or Google Drive) that includes:
- The Music: High-quality MP3 (320kbps) and WAV files of the track(s).
- Artwork: The high-resolution digital master of the cover art.
- Press Photos: Two or three of your absolute best, high-res official photos.
- Artist Bio: A clean PDF with your current biography.
- Press Release: The official announcement for your new music.
- Social Links: A simple text file with direct links to your website, social media profiles, and streaming pages.
Having this kit ready to go before your release day makes your outreach incredibly efficient and professional. It shows people you respect their time, which makes them far more likely to check out—and hopefully feature—your work.
Implementing a Bulletproof Backup and Archiving Strategy
All that meticulous organization we’ve talked about? It’s completely worthless if your hard drive dies. A stolen laptop, a corrupted session file, a simple software glitch—any of these can instantly wipe out years of your work. Relying on a single copy of your music catalog isn't just risky; it's a gamble no artist can afford to take.
This is why a solid, multi-layered backup strategy isn't just a "nice to have." It's an absolutely essential piece of your professional infrastructure. We're talking about building a system that can withstand any technical disaster, giving you the peace of mind to create instead of constantly worrying about losing everything.
The 3-2-1 Backup Rule: Your Golden Ticket
In the world of data protection, the gold standard is the 3-2-1 backup rule. It's a brilliantly simple framework that IT pros live by, and it's perfectly suited for musicians guarding their priceless audio files.
Here’s the breakdown:
- Three Copies: Always maintain at least three complete copies of your data. This means your primary working files plus two separate backups.
- Two Different Media: Store those copies on at least two different types of storage. Don't just use two identical external drives; maybe use one external SSD and one cloud service. This protects you if a certain type of hardware fails.
- One Off-Site Copy: Keep at least one of those copies in a different physical location. This is your safeguard against localized disasters like fire, flood, or theft.
Following the 3-2-1 rule means that no single event can destroy your entire archive. If your main drive fails, you have two other copies. If your studio is inaccessible, your off-site backup is safe and sound.
Choosing Your Backup Solutions
With the 3-2-1 framework as our guide, you can start mixing and matching storage solutions that fit your workflow and budget.
Local External Drives:
This is your first line of defense. A fast external SSD or a high-capacity HDD is perfect for daily or weekly backups of your current projects. Think of this as your primary, easily accessible local backup.
Network Attached Storage (NAS):
For those with a dedicated studio space, a NAS is a fantastic option. It’s essentially a private, mini-cloud that lives on your local network. It allows multiple computers to back up to a central, protected location, making it a great choice for your second local copy.
Cloud Storage Services:
Services like Dropbox, Google Drive, or the set-it-and-forget-it Backblaze are the perfect candidates for your critical off-site copy. They automatically sync your designated folders to their secure servers, ensuring your work is safe from any disaster that could strike your home or studio.
This move toward cloud-based systems mirrors what’s happening in the wider music industry. In the United States, streaming has completely taken over how people consume music, with subscription accounts projected to hit 105 million by mid-2025. This cloud-first model now makes up 84% of US music industry revenue, demonstrating how digital, off-site storage has become the new standard. You can find more details on this trend in the RIAA's mid-year report.
Automate Your Peace of Mind
Let's be honest: the best backup strategy is one you don't have to think about. Manually dragging files to a drive every night is a recipe for disaster because, eventually, you'll forget. Automation is key.
Use your computer’s built-in software, like Time Machine on macOS or File History on Windows, to schedule automatic, regular backups to your external drive. For your off-site copy, a service like Backblaze is ideal because it runs quietly in the background, constantly uploading any new or changed files without you lifting a finger.
Building a truly resilient system goes beyond just having copies. To really dig in, I'd recommend reading a technical guide on how to prevent data loss to deepen your understanding. By combining a proven framework like the 3-2-1 rule with smart automation, you’ll create a genuinely bulletproof system that protects your music for years to come.
Got Questions? Let's Talk Music Organization.
Even with a perfect system on paper, you're bound to hit a few snags when you start wrangling years of music files. It happens to everyone. Let's walk through some of the most common questions I hear from artists, so you can get your digital house in order and keep it that way.
Getting these details right isn't just about being tidy—it's about running your career like a pro.
What’s the Best Cloud Storage for Musicians?
Honestly, there’s no single "best" service. The right choice really hinges on your workflow, your budget, and whether you're working solo or with a team. Most artists I know end up using a mix of services to get the job done right.
Here’s a breakdown of the heavy hitters and where they shine:
- Dropbox is still king for active collaboration. Its "Smart Sync" feature is a genuine lifesaver for anyone working on a laptop with limited hard drive space. When you're sending files back and forth with a producer or bandmates, nothing beats its speed and reliability.
- Google Drive is a fantastic starting point, especially if you’re already living in the Google ecosystem (Gmail, Docs, etc.). It gives you a decent chunk of free storage, which is a huge plus when you're just starting out and budgets are tight.
- Backblaze is my go-to recommendation for pure, set-it-and-forget-it backup. For a flat monthly fee, it backs up your entire computer with unlimited storage. It’s not for sharing or collaboration; it’s your insurance policy for when disaster strikes.
- Amazon S3 Glacier is for deep, long-term archiving. Think of it as a digital vault for the master files of albums you released five years ago. It's incredibly cheap, but it's not meant for files you need to access quickly.
A really solid strategy is to use Dropbox or Google Drive for your day-to-day projects and have Backblaze running quietly in the background, creating a bulletproof copy of everything. You get the best of both worlds: easy access and total peace of mind.
How Often Should I Back Up My Music?
This depends entirely on what you're working on. For active projects—the song you're mixing right now—your backups should be constant and automatic. That’s what real-time cloud sync from a service like Dropbox is for. You never even have to think about it.
For your entire consolidated archive, you should be doing a full backup at least once a week.
The best rule of thumb is to ask yourself one simple question: "How much work am I willing to lose forever?" If you just spent eight hours tracking vocals, back up that session tonight. Don't ever let more than a few days go by without getting your main local and off-site backups in sync.
Do I Really Need ISRC Codes?
Yes. 100% yes. Let me be clear: if you plan on releasing your music commercially on Spotify, Apple Music, or anywhere else, an ISRC is non-negotiable.
Think of the ISRC (International Standard Recording Code) as the unique, permanent barcode for a specific recording. It's what allows every single stream, sale, and radio spin to be tracked globally. Without an ISRC, collection societies and distributors have no reliable way of knowing who to pay. You’re basically leaving money on the table.
Most digital distributors like DistroKid or TuneCore will assign ISRCs for you, either for a small fee or as part of their package. You can also apply to manage your own codes through the official agency in your country, which is a good move once your catalog starts to grow.
What's the Difference Between a Master and a Distribution File?
This is a huge one, and a mistake I see artists make all the time. Mixing these two up can degrade your audio quality and cause major headaches later.
Your master file is the holy grail. It's the highest-quality version of your track, straight from the mastering engineer—usually a 24-bit, 48kHz (or even 96kHz) WAV file. This file gets locked away in your archive and should never, ever be altered. It's the pristine source from which all other copies are made.
A distribution file is a copy you create from the master, specifically for sending to streaming services. The universal standard that nearly every platform requires is a 16-bit, 44.1kHz WAV file. Always keep your high-resolution master safe and separate, and only create these distribution-specific versions when you’re ready to upload.
Ready to take control of your music career with a platform built for artists? At OohYeah, we provide the tools you need to stream, sell, and market your work directly to your fans—all in one place. Start building your artist-first business today at https://oohyeah.app.