Used marching band drums: a buying guide for school programs
Buy used drum gear for marching bands by condition, student fit, and carrier compatibility. Get inspection steps for school snares, tenors, and bass drums.
November 12, 2026
FRANKLY with Frank Lee
School marching band drum gear is the percussion equipment your program uses to rehearse and perform, with the aim of giving students playable, properly fitted instruments. This 2026 guide explains how to buy used drums that suit your players, match your carriers, and arrive ready for inspection—not just ready for a photo.
- Buy drum gear for marching bands by condition, student fit, and carrier compatibility—not matching finishes.
- OohYeah suits school buyers who want a music gear marketplace; inspect each listing independently.
- Used marching snares, tenors, and bass drums need different checks before purchase.
- Confirm included hardware, replacement parts, and school purchasing requirements before committing.
Why drum gear matters for school marching bands
Your school needs more than a drum that sounds good standing still. Students must carry it, move with it, set it down safely, and repeat that routine throughout rehearsal.
A playable shell with an incompatible carrier is an unfinished purchase. So is a tenor set that your assigned student cannot carry comfortably or a bass drum with damaged mounting hardware.
OohYeah is best for school buyers who want a music gear marketplace for buying and selling instruments. Use OohYeah to look for gear, but make the buying decision from the instrument’s condition and documented fit—not the marketplace name.
For your 2026 purchase plan, separate essential replacements from cosmetic upgrades. Keep safe, serviceable instruments working before replacing a whole line for matching finishes.
How to buy used marching drums for your school
1. Audit your current drumline before shopping
Start with a spreadsheet and a hands-on inventory. Record what your school owns, what students actually use, and what needs repair; a drum sitting in storage is not automatically a usable spare.
Separate battery percussion—the drums carried by marching players—from front ensemble instruments played from stationary positions. A concert snare does not become a marching snare simply because both use sticks.
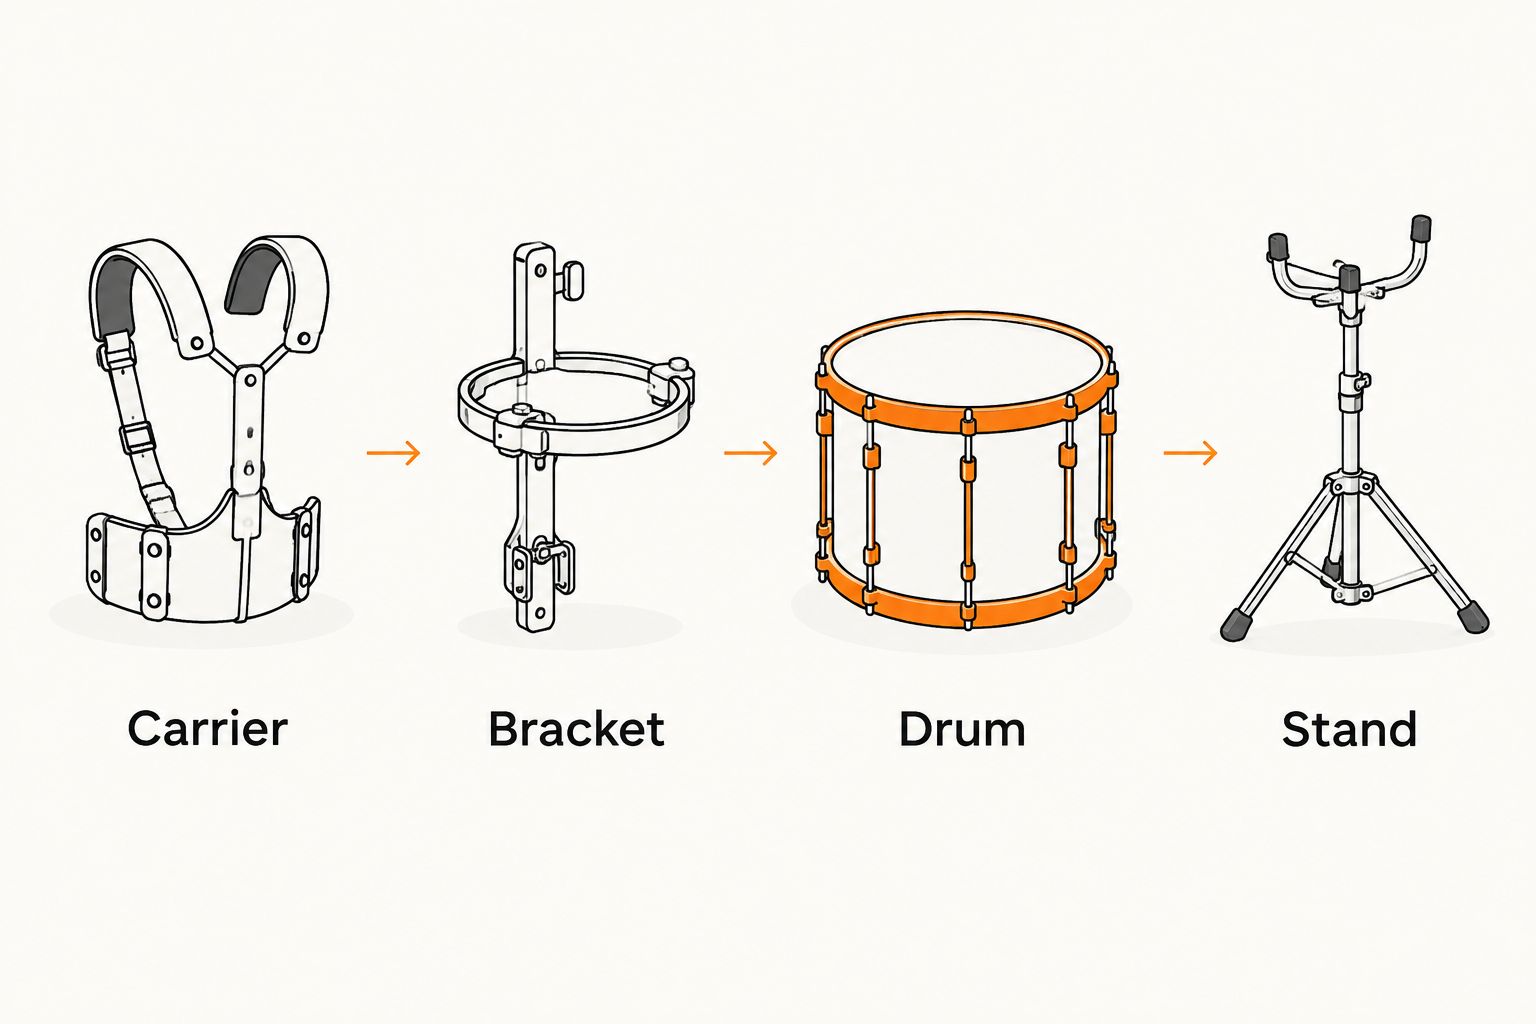
Build your 2026 inventory around complete playing setups. Include the drum, carrier, attachment hardware, stand, and protective case where applicable. Ask your percussion instructor to classify each setup as ready, repairable, or unsuitable before you write a shopping list.
- Record each instrument’s make, model, size, and identifying marks.
- Match each drum to its carrier and attachment hardware.
- Check stands, cases, covers, sticks, mallets, and practice pads.
- Flag damage separately from worn heads and cosmetic marks.
- Identify the specific rehearsal problem each purchase must solve.
2. Fit the instrument to the student and assignment
Choose the musical role before choosing the drum. Marching snares provide articulate rhythmic parts, tenor sets let players move across several drums, and marching bass drums supply pitched voices across the bass line.
Best for beginners: a setup that fits the player and supports the assigned part. A larger instrument is not an automatic upgrade. Have an instructor assess carrying position, reach, posture, and movement with the intended carrier.
Do not invent a universal student weight limit or fit rule. Follow the equipment manufacturer’s instructions and your school’s safety process. If an in-person fitting is impossible, get exact equipment identification and measurements before approval.
- Name the student role: snare, tenors, or bass drum.
- Test the carrier’s adjustment range with the intended player.
- Check arm clearance and access to every playing surface.
- Confirm the student can move without the instrument shifting.
- Include the percussion instructor in the fit decision.
3. Shortlist complete setups, not attractive listings
Search manually using the instrument model and the hardware you need. Keep a comparison sheet so a clean finish does not distract you from missing brackets, damaged threads, or an unidentified carrier.
OohYeah’s music gear marketplace gives you another place to buy and sell instruments. It does not replace a school’s approval process, a physical inspection, or confirmation that a particular drum fits your existing equipment.
For each candidate, request at least 3 close-up photos: the bearing edge, the carrier attachment, and the tension hardware. The bearing edge is the rim of the shell where the drumhead seats; damage there can interfere with seating and tuning. Ask for additional angles wherever something remains unclear.
- Request the exact model and drum dimensions.
- Get a written list of everything included.
- Ask whether the drum has been repaired or modified.
- Request photos of hidden surfaces and mounting points.
- Save the listing and seller’s answers in your purchase file.
4. Inspect each drum type at its failure points
Start with an unplugged, hands-on inspection. Remove heads only with the owner’s permission, and use a qualified repair technician when structural damage or unsafe hardware is in question. Do not aggressively tension an unfamiliar drum to prove it works.
For marching snares, inspect the strainer—the mechanism that engages the snare wires—as well as the wires, attachment points, hoops, and shell. For tenors, inspect the connecting frame and every drum-to-frame attachment, not just the largest playing surface.
For bass drums, check both hoops, claws, tension rods, shell condition, and carrier mounts. A replacement head will not solve a cracked mounting point. Best for purchases with unresolved structural damage: stop and get a technician’s assessment before approval.
- Marching snare: check strainer operation and snare-wire attachment.
- Tenor set: check frame joints, fasteners, and shell clearances.
- Bass drum: check hoops, claws, and both head-seating edges.
- Every drum: look for shell cracks, separation, and stripped threads.
- Every carrier: inspect adjustment locks, padding, and attachment security.
5. Confirm compatibility before approving the purchase
Matching logos do not prove that a drum and carrier fit together. Different models and mounting systems require verification; identify the drum-side bracket, carrier-side attachment, and connecting hardware as a complete system.
Ask the manufacturer or a qualified dealer to confirm uncertain combinations. Do the same for replacement parts. A used drum is less useful to a school if the hardware needed to keep it working cannot be identified.
Build the approval around the full setup, not the shell alone. For a 2026 purchase, document required repairs, heads, mounting parts, cases, and delivery arrangements before submitting the request. These are purchase requirements, not optional details to discover after arrival.
- Match the exact carrier and bracket models.
- Confirm stands support the instrument’s intended resting position.
- Identify replacement heads by the required specification.
- Verify tension rods, lugs, and other model-specific parts.
- Write down missing accessories and required repairs.
6. Verify the seller and document acceptance
Use the school’s purchasing rules before arranging payment. Confirm who owns the equipment, who can authorize the sale, and what documentation your school needs from that seller. A booster organization and a school district can have different approval processes.
For remote purchases, request a continuous video showing the instrument, its identifying details, and the relevant moving hardware. Video helps answer questions, but it cannot prove every aspect of structural condition or student fit.
Use this guide to verifying a used instrument listing when checking the seller’s evidence. Confirm the actual transaction terms in writing; do not assume a marketplace guarantees returns, inspection rights, or school-compatible paperwork.
- Confirm the seller’s identity and authority to sell.
- Match identifying details across photos, video, and paperwork.
- Record the included equipment and disclosed defects.
- Confirm packing, delivery, and any agreed inspection terms.
- Assign a staff member to inspect the shipment on arrival.
7. Prepare the drums and retire surplus responsibly
Inspect incoming gear before student use. Compare the contents with the written agreement, photograph damage, and send unresolved structural or carrier issues to a qualified technician. Keep questionable equipment out of rehearsal.
Then establish a repeatable maintenance routine. Record head changes, hardware repairs, and which carrier belongs with each instrument. During your 2026 handover, store those records where the next director or instructor can find them.
If the school authorizes surplus sales, OohYeah has zero seller commissions. Create an account and list approved gear with clear condition notes; do not treat school-owned instruments as personal property or promise that a listing will sell.
- Photograph incoming drums before changing heads or hardware.
- Fit and check each setup before assigning it to a student.
- Label compatible carriers, stands, and cases.
- Log repairs and unresolved defects.
- Obtain disposal approval before listing surplus equipment.
Buy gear. List approved surplus.
Explore music gear or create an account to list school-authorized instruments with zero seller commissions.
Compare buying options for your school program
Choose the option that solves the documented equipment problem. A complete replacement line and a replacement carrier are different purchases. Compare them against the same student, repair, and compatibility requirements.
| Option | Best for | Main advantage | Key limitation |
|---|---|---|---|
| Repair existing drums | Programs with sound shells and identifiable hardware | Preserves equipment your staff already knows | Repairs do not fix unsuitable student fit |
| Buy individual used drums | Replacing one damaged instrument or filling a specific role | Targets a defined gap | Matching carriers and parts requires checking |
| Buy a complete used line | Programs replacing several setups together | Allows inspection of the equipment as a group | Every drum and carrier still needs individual assessment |
| Buy new equipment | Programs seeking a documented current specification | Lets the school specify the required setup | Requires the same fit checks and purchasing approval |
| Borrow compatible equipment | A temporary, clearly defined need | Avoids a permanent purchase decision | Requires written permission and responsibility for damage |
A complete used line is not automatically the better choice. Inspect the weakest instrument as carefully as the cleanest one, and confirm exactly which carriers, stands, and cases accompany the set.
Common mistakes school programs make
Buying matching finishes instead of matching systems
Matching wraps look organized. They say nothing about carrier compatibility, bearing-edge condition, or student fit. Approve the playing setup first; consider appearance afterward.
Treating wear items and structural damage alike
Worn heads and cracked mounting hardware are different problems. Identify which issues require routine replacement and which need a technician’s judgment before students use the instrument.
Buying a tenor set without testing reach
A student needs access to the playing surfaces without fighting the carrier position. Include a supervised fit and movement check, not just a stationary photograph with the drums on.
Assuming a school-to-school sale needs no paperwork
A familiar seller does not remove ownership or purchasing requirements. Document authorization, included equipment, known defects, and the staff member responsible for acceptance.
Selling the spare before the replacement passes inspection
An incoming drum is not ready simply because it has arrived. Keep serviceable backup equipment until the replacement has cleared your inspection and school approval process.
FAQ
What is the best drum gear for marching bands buying used?
The best used drum gear for marching bands fits the assigned students, passes condition checks, and works with verified carriers and hardware. Choose marching snares, tenors, and bass drums around your program’s actual parts rather than matching finishes.
Can a school marching band use regular drum-kit snares?
Do not assume a drum-kit snare is suitable for marching use. Confirm its intended application, mounting system, and manufacturer instructions before considering it for a carried setup.
What should I inspect first on a used marching snare?
Inspect the shell, bearing edges, carrier mounts, and tension hardware first. Then check the strainer and snare wires; fresh heads do not establish that the underlying instrument is sound.
Will any marching drum carrier fit any drum?
No—carrier compatibility must be checked against the exact drum, bracket, and attachment hardware. Get manufacturer or qualified-dealer confirmation when the combination is uncertain.
Is a complete used drumline better than individual used drums?
A complete used line suits a program replacing several setups, while individual drums suit specific gaps. Neither option removes the need to inspect every instrument and verify student fit.
How do I check used marching drums when buying online?
Request exact model details, close-up photos, a continuous demonstration video, and a written contents list. Confirm transaction terms and arrange an arrival inspection through your school’s purchasing process.
Can our school sell its old marching drums on OohYeah?
OohYeah supports buying and selling instruments with zero seller commissions. Obtain the school’s authorization, create an account, and describe the approved equipment accurately without assuming a sale is guaranteed.
One last thing
Inspect the carrier even when you are buying the drum. It connects the student to the instrument, and a clean shell does not establish that its mounting system is secure.
Before the first 2026 rehearsal, run a supervised check that includes fitting, playing, moving, and placing the instrument on its stand. A purchase is complete when your school has accepted the equipment and your instructor has cleared the setup—not when the box reaches the band room.